Using Git to refactor vCloud Tools into separate gems
When I started working on vCloud Tools, we had most of our functionality in one repository. There wasn’t a clear separation of concerns – the code was tightly coupled – and it also meant that a user who only wanted to use one tool to do one job had to install the whole thing. So I pulled out each functional area into an individual Ruby gem.
Rewriting history
When creating the repository for each new gem, I didn't want to lose all the commit history; it is very useful documentation. If I had started each gem from scratch, the commit history would remain in the vcloud-tools repository, but I prefer not to have to go somewhere else to see the history of what I'm working on right now.
I also didn't want to create each directory side-by-side and then delete the unnecessary code, as this would make each repository much larger than it needed to be (as Git stores all the history) and would essentially be several duplicated projects with different bits deleted.
What I really wanted was to go back in time and to have started with this structure from the beginning.
Luckily, Git provides a mechanism to do this: git filter-branch.
Creating the new repository
To get started, I cloned the existing vcloud-tools repository locally:
You need the --no-hardlinks flag because when cloning from a repo on a local machine, files under .git/objects/ are linked to the original to save space, but I wanted my new repo to be an independent copy.
I then deleted the remote in newrepo. I didn't want to push my new, pared-down repo over vcloud-tools.
Deleting irrelevant code
Having made a new repository, I then pruned away any code that was unrelated to that tool. So for example when pulling out vCloud Core, I pruned away all directories that didn't contain vCloud Core code.
For this, I used a tree-filter. This checks out each commit and runs a shell command against it, in this case rm -rf c, where c is an irrelevant directory or file.
Because it's checking out each commit, it takes some time to do it this way (though it speeds up, as using --prune-empty removes commits that are left blank after the shell command does its job, so the total number of commits decreases as you progress through the task).
This command actually allows you to use any shell command you want, but I found that deleting things I didn't require one-by-one, while time-consuming, meant that I picked up some things that had been missed, for example files in the wrong place and tidy-up that needed to be done.
Tidying up
After each time you run this command and prune away files or directories, you need to do some cleanup. (I just wrote a little shell script and ran it each time.)
When you run git filter-branch a .git/refs/original directory is created, to allow for a restore. These objects will be retained if you don't remove them so you need to remove the references:
These are usually cleaned up by Git on a scheduled basis, but because I was going on to remove other folders, I wanted to expire them immediately, and then reset to HEAD in case that had changed anything.
Then, I forced garbage collection of all orphaned entities.
The final line of my shell script just output the size of the .git folder so I could see it getting smaller as I pruned away unneeded code.
Important warning!
You need to be extremely careful when rewriting history. It is very important not to do this on a public repository unless you have a very good reason, as it makes everyone else’s copy of that repository incorrect. So I waited until it was finished and I was happy with my local version before pushing it up to a new repository.
Applying gem structure
For all tools other than vCloud Core, the first thing I had to do was redo the directory structure.
I also had to move the file that loads the dependencies, and during the pruning process is became clear that we had a lot of dependencies at the wrong level, or not required at all. Deleting code is very satisfying!
I then added the required files for a gem, for example a gemspec, a licence. At this point, I also added a CHANGELOG to help us move the tools to open source.
Some interesting things about Git
I discovered some new things. For example, Git is case-insensitive with regard to file names.
told me:
You need to force it with the -f flag.
Also, you can copy commits from another repository, as if you were using git cherry-pick to copy from a branch in the same repository, by creating a patch and applying it locally.
Then I published the gem
To enable our continuous integration, I added a Jenkins job and a Jenkins hook to GitHub so that a commit to master will trigger a build in Jenkins.
Once I was happy that everything was present and correct and it was ready to publish, I added a gem_publisher rake task, and then included that in Jenkins. This means that when a commit is merged to master, if the tests pass and the version has changed, the new version is automatically published to RubyGems.
Ta-dah! vCloud Core.
Finally, I made a pull request on vCloud Tools to remove it.
Pulling out all gems
Over a couple of months I pulled out all the gems and the architecture of vCloud Tools now looks like this:
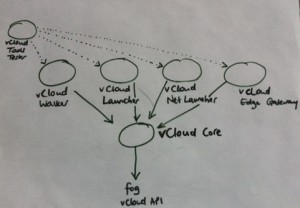
This approach follows the UNIX philosophy of simple tools that do one thing, which together can form a toolchain to do do more complex tasks. vCloud Core now takes care of the interactions with fog and the vCloud API, and the other tools depend on that. vCloud Tools is now a meta-gem that pulls in all the other gems as dependencies. This has definitely made it easier to develop on and use vCloud Tools, and I learned a lot about Git and Ruby gems along the way!
This post originally appeared on the GDS Technology Blog.
If you’d like to be notified when I publish a new post, and possibly receive occasional announcements, sign up to my mailing list: