How to Write Efficient CSS – Basic CSS
I recently did a knowledge share at work on how to write efficient CSS, and one of my colleagues – a senior developer with a lot of experience – said "I felt the penny drop". High praise indeed, so I thought it was worth reproducing it here, even though other similar divs are available on the internet.
The write-up is pretty long, so I've divided the divs into Basic CSS in which I cover:
and Evaluation of CSS in which I cover how CSS is evaluated and some things we can do to make it more efficient.CSS
For those who have no idea at all what CSS is, I can recommend nothing better than the w3schools excellent intro. The w3school is always my first port of call for definitive answers on html, CSS and JavaScript. I will assume that you at least know that CSS stands for Cascading Style Sheets, and realise why separating that from html can make development easier.
Syntax
CSS is applied to html elements using selectors. The syntax of CSS is:
selector { CSS property : value; }If you want to add comments, use /* comment */ as C-style comments (//) will cause your CSS to fail silently – all you'll see is your website looking wrong.
Let's look at some more details of how CSS is written.
a.blog-post, ul#nav.dhtml li a.blog-post {
display: block;
float: right;
height: 24px;
width: 24px;
margin: 3px 3px 0 0;
padding: 0 0 0 0;
background: url(../images/film_help.png) no-repeat;
}
Padding and the box model
Padding and Margin shortcuts
Ems
No-repeat
Optional;
If you've ever worked with CSS at all, no doubt you have fiddled around changing the padding or the margin without actually knowing why. I certainly did. Until I saw this diagram, which suddenly made everything clear:
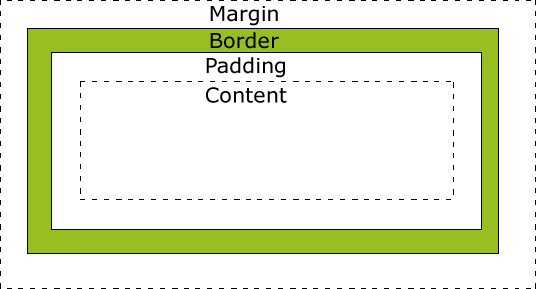
Have a look at the page on w3schools, but basically the margin is how far the box is from other elements, and the padding is how much space you'd like between the inside of the box and the content. Genius. And obviously, although not given in the CSS example above, you can manipulate the border too, as I have done in my code samples on this page, for example border-style: dashed;
It is possible to specify each direction of the padding, for example padding-left:3px. However you can also use a shortcut, as has been done in the example. The order is like a clock: Top, Right, Bottom, Left; so an element with the CSS in the example applied to it will have a margin on the top and the right. Another way to remember this is by remembering that if you don't get it right there will be TRouBLe. :o)
However, you can make it even shorter than that. Three values set the top to the first, the right AND left to the second and the bottom to the third. For example:
margin:10px 5px 15px;
top margin is 10px
right and left margins are 5px
bottom margin is 15px
Two values set the top and bottom to the first, and the right and left to the second, and one value sets them all to the same. Here if you didn't follow that.
Sizes can be given in pixels, ems or percentages. Pixels you know. Percentages are as a percentage of the enclosing elements (see inheritance). Ems are also calculated as percentages, where the default for most browsers is that 1em = 16px. However (of course) there is a slight twist in that ems are not calculated correctly in IE, so .85em is smaller than 85%. The w3schools recommendation is to use a combination of percentages and ems. The developer tools are invaluable in this respect and there is a useful discussion here.
In the meantime you might want to remember this hilarious joke:
A brief word on the image. background: url(../images/film_help.png) no-repeat;. The url is a link to where you have stored the image. no-repeat means you want it to appear once. The default is for it to repeat both horizontally and vertically. A nice trick for filling in a background is to create a slim image with the gradiations you want and then repeat-x so it fills the div.
An aside: another way to include images is to instead use a data url. This is where you encode the image inline. The advantage of this is that it doesn't require an extra HTTP request to get the image, and the key to a faster website is minimising the HTTP requests. However, there are reasons (other than the ubiquitous incomplete cross-browser support) why you might not want to use data urls – a good discussion can be found here. Other ways to minimise the HTTP requests associated with loading images can be found here.
The last semi-colon is optional. In fact, the structure of a CSS class is selector { CSS property : value } – you only need the semi-colon if you have subsequent instructions. I always put it in anyway though, there's no reason not to.
Selectors
There are loads of selectors in CSS. For now, I'll just talk about the most common:
html element
For example, p { color: red; } would make all text in paragraphs red.#id
Giving the ID makes the one specific element behave in a certain way. It is certainly the most efficient selector (see how it's evaluated, but it isalso slightly pointless. The point of style is to make a website look and feel consistent – with your brand, with itself, etc. IDs are (supposed to be) unique on a page. So why would you want to style just one thing?.class
The most common selector and the one I think we should all be using most of the time.*
The universal selector. Some interesting discussion here, but in summary it is the least efficient selector and also allows you to bypass inheritance. I say AVOID.Combinations
x, y
This means, apply the style you are outlining to all xs and all ys. For example p, .blog-intro { font-weight: bold; } makes the text in all paragraphs bold AND the text in all elements with the class "blog-intro".
x y
The descendant selector. This matches any y which is a descendant of any x. For example p .blog-intro { font-weight: bold; } makes all the text within a paragraph that has the class of "blog-intro" bold – even if it is nested several layers within. It is very inefficient. See later post
x > y
The child selector. This matches any y which is a child of any x. This is also inefficient, though less inefficient than the descendant selector.
a.blog-post, ul#nav.dhtml li a.blog-post
So, to return to the selector in the example which I have so far ignored.
To spell it out, the style outlined here will be applied to any link with the class of blog-post, AND any link with the class of blog-post which is a descendant of a list item which is itself a descendant of an unordered list with the id of nav and a class of dhtml.
Pretty complicated. Over-complicated, I will argue. But just to note – the reason you might want both of these (you might think the first would cover the second) is because you may well have one or more intermediate styles that have altered the link in the list item further. For example if you have styled ul#nav.dhtml differently, the link will appear differently unless you reset it here.
In my view, examples like this are why people do not like CSS. Oh, and this is a real example from a live application, by the way. Names slightly changed to protect the innocent.
The Cascade
As hinted at above, you can have multiple styles applied to an element, and the cascade is what determines which one is actually applied. CSS styles are cascaded in the following order, with the one applying last being the one that sticks:
- Origin (i.e. Browser then Author)
- Importance (normal vs !important)
- Specificity
- Inline
- Highest number of id selectors
- Highest number of class, attribute, or pseudo classes
- Highest number of elements and pseudo elements
- If still the same, the order in which they appear.
Here for (very dense) more.
Specificity
Selectors are considered to be specific in the following way (ordered from the least to the most specific):
- The type selector
- The descendant selector
- The adjacent sibling selector
- The child selector
- The class selector
- The attribute selector
- The ID selector
Order
The order, listed from the least precedence to the most precedence:
- Browser default
- External style sheet
- Internal style sheet (i.e. written in the head)
- Inline style (i.e. inside an HTML element)
Notes:
An external stylesheet will override an internal stylesheet if it's linked to in the head after the internal style sheet.
And the most common trip-up in legacy code systems: The same class within a CSS file will override one written higher up in that file.
important!
You will have seen that important! takes precedence in the cascade. This is what you add if you can't get the style you want using the normal rules of cascade and inheritance. Don't use it unless you really have to – to me, it says "I don't know how CSS works so I'm just going to hack it."
Developer Tools
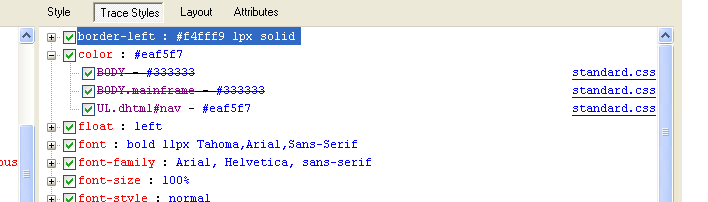
All modern browsers have developer tools so you can examine elements to see what CSS is being applied, and in a surprising departure from the norm, the best one in my opinion is the one available in IE when you press F12.
For example, in this screenshot you can see that the colour being applied here is the one from the class ul.dhtml#nav not the one specified for body or the one specified for body.mainframe.
Inheritance
I could not do a better job of writing up inheritance than this company presentation. I really recommend you go and click through it. It starts very simple and you may think it's a waste of your time but if you are not 100% sure how inheritance in CSS works then this will really help.
A brief summary though if you really can't be bothered: Elements inherit styles from the elements within which they are nested. So in the following html, if you apply a style of font-weight: bold to p, then the text inside the span will also be bold.
‹body›
‹p›I'm bold. ‹span›And so am I!‹/span›‹/p›
‹/body›
Read on for how to write it efficiently!
If you’d like to be notified when I publish a new post, and possibly receive occasional announcements, sign up to my mailing list: